To make our blog more attractive and explanatory, many a times we put pictures in our posts. But when these pictures are clicked, it takes us to the dark room with all the images we have posted. We can easily make these images unclickable, so as to remain on the same page,
Latest Post
How to make header image unclickable
If header image is click-able, on clicking, it reloads the same page which is of no use, so we can make header images unclickable as under;
Open Template---->Edit HTML---->Proceed


1. Now check Expand Widget Template (as directed in the below given image)
2. Find this code (you may take help with Ctrl+F for finding)
<div id='header-inner'>
<a expr:href='data:blog.homepageUrl' style='display: block'>
<img expr:alt='data:title' expr:height='data:height' expr:id='data:widget.instanceId + "_headerimg"' expr:src='data:sourceUrl' expr:width='data:width' style='display: block'/>
</a>
</div>
3. Remove or delete the codes in blue color, also shown in below given image, against pointers 2 and 3

Add image at the top above header or header image
In some templates there is no option to add image before/above the header or header image because in the layout we do not have 'Add a Gadget' field before/above the header, so we can manually create this option as under;
Open Template----->Edit HTML------>Proceed
Now find the following code (you may use Ctrl+F to find this stuff)
<b:section class='header' id='header' maxwidgets='1' showaddelement='no'>
<b:widget id='Header1' locked='true' title='YOUR BLOG TITLE(Header)' type='Header'/>
Change maxwidgets to 2 and shoaddelement to yes
Save Template

Before:

After:

How to remove 'Subscribe to: Posts (Atom)'
At the bottom of blog you find a link named 'Subscribe to: Posts (Atom), if you want you can remove this as follows:


Now follow three steps as shown in below image;
1. Check Expand Widget Template box
<b:include name='feedLinks'/>
delete this code
3. Save Template

How to remove 'HOME' link from bottom
To give a professional look to your blog you may like to remove HOME link from bottom of your blog. 'HOME' can be removed as under;
Open your Template----> Edit HTML----->Proceed


1. (Check) Expand Widget Template box
2. Now find the following code (you may find with the help of Ctrl+F command);
<a class='home-link' expr:href='data:blog.homepageUrl'><data:homeMsg/></a>
delete the above code
3. Save Template, you are done.

How to remove date from top of your post
Many a time we don't want that we should specify that when our post was generated, so just don't like the date to be shown on our post. To remove the date from top of our blog post just do the following;
Go to Dashboard, open Layout as shown below;
Go to Dashboard, open Layout as shown below;
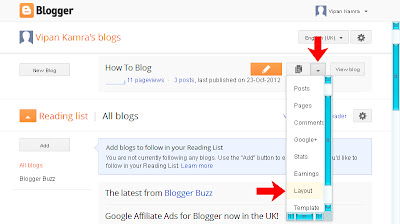
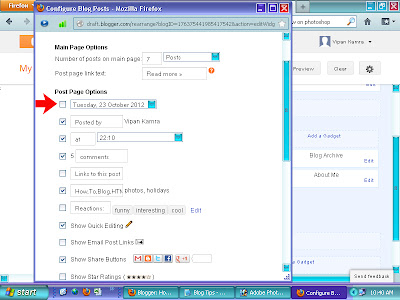
Edit blog post box shown as under;

In the Main Page Options under Post Page Options un-check the top one i.e. Date e.g. 'Tuesday, 23 October 2012'
Now press Save button at the bottom of Main Page Options.
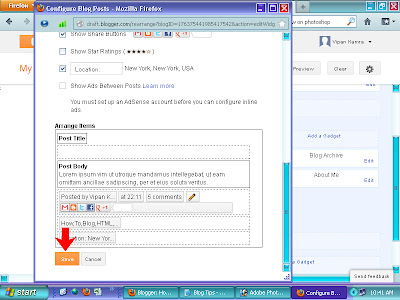
That's it, date from the top of your post is removed, like wise other options available on the Main Page Options can be managed well as per your choice.
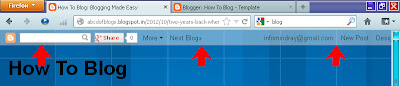
How to remove navbar
Navbar is something situated at the top of blog having various links place horizontally, which usually we do not want in our website/blog to give it a professional look. Three ways we can remove navbar, easiest one is third one then 2nd and at last 1st. We can easily remove this as explained under;
Procedure 1:
Find the following yellow HTML code (or resembling) in your template in the upper region (you may use Ctrl+F to find);
Blogger Template Style
Name: Awesome Inc.
Designer: Tina Chen
URL: tinachen.org
----------------------------------------------- */
Now paste the following blue code just below the yellow code;
#navbar-iframe {
display: none ! important;
}
save the template and you are through. If you notice a blank space at the top in place of navbar. you can remove this blank space too, paste the following blue code below the yellow code;
#navbar-iframe {display: none !important;}body .navbar {
height:0px;
}
.content-outer {
margin-top:0px;
}
you are done after saving your template.
Before:-
After:-
Procedure 2:
On the dashboard open Template

then open customize

Now adopt four steps by clicking
1. Advanced------> 2. Add CSS----->3. Paste the following code in the white blank space
#navbar-iframe {
display: none ! important;
}
4. Apply to Blog

Procedute 3:
In the template section select Layout

Press Edit in the Navbar section

On the Navbar Configuration page check Off button and then Save. It's done.

Subscribe to:
Posts (Atom)
Popular Posts
-
 If header image is click-able, on clicking, it reloads the same page which is of no use, so we can make header images unclickable as unde...
 -
 Many a time we don't want that we should specify that when our post was generated, so just don't like the date to be shown on our ...
 -
 At the bottom of blog you find a link named 'Subscribe to: Posts (Atom), if you want you can remove this as follows: Open Template...
 -
In some templates there is no option to add image before/above the header or header image because in the layout we do not have 'Add a ...
-
To make our blog more attractive and explanatory, many a times we put pictures in our posts. But when these pictures are clicked, it takes ...
-
 To give a professional look to your blog you may like to remove HOME link from bottom of your blog. 'HOME' can be removed as under...
 -
Two years back when I was finding a way to promote my business online, I used to visit very attractive, nicely compiled websites and blogs...
-
 Navbar is something situated at the top of blog having various links place horizontally, which usually we do not want in our website/blog ...